
【黑马】Vue全家桶-Vuex(学习打卡10)
Vuex 概述
1. 组件之间共享数据的方式
这些只适合小范围的数据共享
父向子传值:
v-bind属性绑定子向父传值:
v-on事件绑定兄弟组件之间共享数据:
EventBus$on接收数据的那个组件$emit发送数据的那个组件
2. Vuex 是什么
Vuex 是实现组件全局状态(数据)管理的一种机制,可以方便的实现组件之间数据的共享。
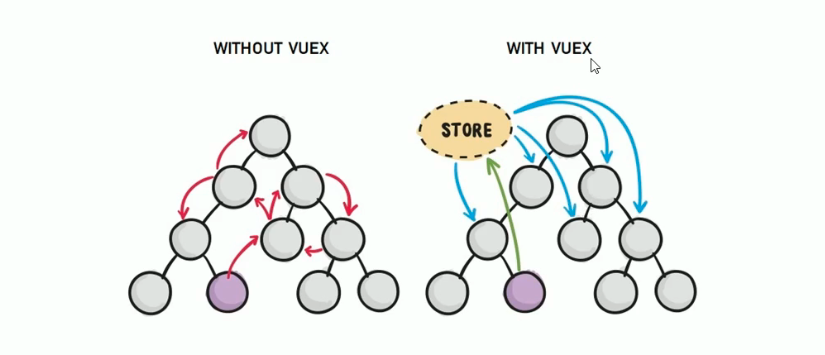
3. 使用 Vuex 统一管理状态的好处
- 能够在 vuex 中集中管理共享的数据,易于开发和后期维护
- 能够高效地实现组件之间的数据共享,提高开发效率
- 存储在 vuex 中的数据都是响应式的,能够实时保持数据与页面的同步
4. 什么样的数据适合存储到 Vuex 中
一般情况下,只有组件之间共享的数据,才有必要存储到 vuex 中;对于组件中的私有数据,依旧存储在组件
自身的 data 中即可。
Vuex 的基本使用
创建项目
首先创建项目,具体步骤如下:
- 【详情】打开Vue-Cli可视化面板,创建新项目
vux_demo1,包管理器npm,初始化init project。 - 【预设】选择
Manual手动配置项目 - 【功能】选择
Bable、Vuex、Linter / Formatter、Use config files - 【配置】版本可以选Vue
2.x;Pick a linter / formatter config选择标准的配置文件ESLint + Standard config - 创建项目,不用保存预设。耐心等待它下载npm包。
使用Vue-Cli可视化面板创建后,以下步骤可跳过(会自动配置好)
- 安装 vuex 依赖包
1
npm install vuex --save
- 导入 vuex 包
1
2
import Vuex from 'vuex'
Vue.use(Vuex) - 创建 store 对象
1
2
3
4const store = new Vuex.Store({
// state 中存放的就是全局共享的数据
state: { count: 0 }
}) - 将 store 对象挂载到 vue 实例中
1
2
3
4
5
6
7
8new Vue({
el: '#app',
render: h => h(app),
router,
// 将创建的共享数据对象,挂载到 Vue 实例中
// 所有的组件,就可以直接从 store 中获取全局的数据了
store
})
案例:计数器01(项目初始化)
在可视化面板运行项目,打开页面。
清空
App.vue文件代码1
2
3
4
5
6
7
8
9
10
11<template>
<div>Hello World.</div>
</template>
<script>
export default {
data () {
return {}
}
}
</script>创建
MyAddition.vue和MySubtraction.vue组件1
2
3
4
5
6
7
8
9
10
11
12
13
14<template>
<div>
<h3>当前最新的count值为:</h3>
<button>+1</button>
</div>
</template>
<script>
export default {
data () {
return {}
}
}
</script>在
App.vue中使用1
2
3
4
5
6
7
8
9
10
11
12
13
14
15
16
17
18
19
20
21
22
23
24
25<template>
<div>
<my-addition>Hello World.</my-addition>
<p>-----------------------------------------</p>
<my-subtraction></my-subtraction>
</div>
</template>
<script>
import Addition from './components/MyAddition.vue'
import Subtraction from './components/MySubtraction.vue'
export default {
data () {
return {}
},
// 注册为私有子组件
components: {
'my-addition': Addition,
'my-subtraction': Subtraction
}
}
</script>项目根目录创建
.prettierrc.js填写格式化配置(格式化快捷键是Shift+Alt+F)1
2
3
4
5
6
7
8
9module.exports = {
semi: false, //不使用分号
singleQuote: true, //使用单引号
bracketSpacing: true, //括号内部不要出现空格
useTabs: false, //使用 tab 缩进
tabWidth: 2, //缩进空格数
trailingComma: 'none', //末尾逗号
printWidth: 1000, //行宽,超过这个数值才换行。否则默认每个标签属性单独占一行
}在项目根目录的
.eslintrc.js代码检查rules中添加一行代码,防止运行时出现“Missing space before function parentheses”的报错。(修改后仍然报错可以重新运行项目)1
2
3
4
5rules: {
'no-console': process.env.NODE_ENV === 'production' ? 'warn' : 'off',
'no-debugger': process.env.NODE_ENV === 'production' ? 'warn' : 'off',
'space-before-function-paren': 0 //函数参数前的意外空格
}
Vuex 的核心概念
1. 核心概念概述
Vuex 中的主要核心概念如下:
- State
- Mutation
- Action
- Getter
2. State
State 提供唯一的公共数据源,所有共享的数据都要统一放到 Store 的 State 中进行存储。
1 | // 创建store数据源,提供唯一公共数据 |
- 比如在
store/index.js中的state里添加属性count: 01
2
3
4
5
6
7
8
9
10
11
12
13
14
15
16
17
18import Vue from 'vue'
import Vuex from 'vuex'
Vue.use(Vuex)
export default new Vuex.Store({
state: {
count: 0
},
getters: {
},
mutations: {
},
actions: {
},
modules: {
}
})
组件访问State数据的第一种方式
1 | this.$store.state.全局数据名称 |
- 比如在加法组件
MyAddition.vue可以这样使用:1
2
3
4
5
6
7
8
9
10
11
12
13
14<template>
<div>
<h3>当前最新的count值为:{{$store.state.count}}</h3>
<button>+1</button>
</div>
</template>
<script>
export default {
data() {
return {}
}
}
</script>
组件访问State数据的第二种方式
1 | // 1. 从 vuex 中按需导入 mapState 函数 |
通过刚才导入的 mapState 函数,将当前组件需要的全局数据,映射为当前组件的 computed 计算属性:
1 | // 2. 将全局数据,映射为当前组件的计算属性 |
- 比如在减法组件
MySubtraction.vue可以这样使用:1
2
3
4
5
6
7
8
9
10
11
12
13
14
15
16
17
18
19
20
21<template>
<div>
<h3>当前最新的count值为:{{count}}</h3>
<button>-1</button>
</div>
</template>
<script>
// 1. 从 vuex 中按需导入 mapState 函数
import { mapState } from 'vuex'
export default {
data() {
return {}
},
// 2. 将全局数据,映射为当前组件的计算属性
computed: {
...mapState(['count'])
}
}
</script>
3. Mutation
Mutation 中的事件处理函数用于变更 Store 中的数据。
- 只能通过 mutation 变更 Store 数据,不可以直接操作 Store 中的数据。
- 通过这种方式虽然操作起来稍微繁琐一些,但是可以集中监控所有数据的变化。
触发 mutations 的第一种方式
1 | // 定义 Mutation |
1 | // 触发mutation |
可以在触发 mutations 时传递参数:
1 | // 定义Mutation |
1 | // 触发mutation |
- 比如在加法组件
MyAddition.vue可以这样使用:1
2
3
4
5
6
7
8
9
10
11
12
13
14
15
16
17
18
19
20
21
22
23
24
25
26<template>
<div>
<h3>当前最新的count值为:{{$store.state.count}}</h3>
<button @click="btnHandle1">+1</button>
<button @click="btnHandle2">+N</button>
</div>
</template>
<script>
export default {
data() {
return {}
},
methods: {
btnHandle1() {
// 触发 mutations 的第一种方式
this.$store.commit('add')
},
btnHandle2() {
// 触发 mutations 的第一种方式
// commit 的作用就是触发某个mutations函数
this.$store.commit('addN', 3)
}
}
}
</script>
触发 mutations 的第二种方式
this.$store.commit() 是触发 mutations 的第一种方式,触发 mutations 的第二种方式如下:
1 | // 定义 Mutation |
1 | // 1. 从 vuex 中按需导入 mapMutations 函数 |
通过刚才导入的 mapMutations 函数,将需要的 mutations 函数,映射为当前组件的 methods 方法:
1 | // 2. 将指定的 mutations 函数,映射为当前组件的 methods 函数 |
可以在触发 mutations 时传递参数:
1 | // 定义 Mutation |
1 | // 2. 将指定的 mutations 函数,映射为当前组件的 methods 函数 |
- 比如在减法组件
MySubtraction.vue可以这样使用:1
2
3
4
5
6
7
8
9
10
11
12
13
14
15
16
17
18
19
20
21
22
23
24
25
26
27
28
29
30
31
32
33<template>
<div>
<h3>当前最新的count值为:{{count}}</h3>
<button @click="btnHandle1">-1</button>
<button @click="btnHandle2">-N</button>
</div>
</template>
<script>
// 1. 从 vuex 中按需导入 mapState 函数
// 1. 从 vuex 中按需导入 mapMutations 函数
import { mapState, mapMutations } from 'vuex'
export default {
data() {
return {}
},
// 2. 将全局数据,映射为当前组件的计算属性
computed: {
...mapState(['count'])
},
// 2. 将指定的 mutations 函数,映射为当前组件的 methods 函数
methods: {
...mapMutations(['sub', 'subN']),
btnHandle1() {
this.sub()
},
btnHandle2() {
this.subN(3)
}
}
}
</script>
4. Action
Action 用于处理异步任务。
如果通过异步操作变更数据(比如延时器),必须通过 Action,而不能使用 Mutation,但是在 Action 中还是要通过触发 Mutation 的方式间接变更数据。
触发 actions 的第一种方式
1 | // 定义 Action |
1 | // 触发 Action |
触发 actions 异步任务时携带参数:
1 | // 定义 Action |
1 | // 触发 Action |
比如在加法组件
MyAddition.vue可以这样使用:1
2
3
4
5
6
7
8
9
10
11
12
13
14
15
16
17
18
19
20
21
22
23
24
25
26
27
28
29
30
31
32
33
34
35
36
37
38
39<template>
<div>
<h3>当前最新的count值为:{{$store.state.count}}</h3>
<button @click="btnHandle1">+1</button>
<button @click="btnHandle2">+N</button>
<button @click="btnHandle3">+1 Async</button>
<button @click="btnHandle4">+N Async</button>
</div>
</template>
<script>
export default {
data() {
return {}
},
methods: {
btnHandle1() {
// 触发 mutations 的第一种方式
this.$store.commit('add')
},
btnHandle2() {
// 触发 mutations 的第一种方式
// commit 的作用就是触发某个mutations函数
this.$store.commit('addN', 3)
},
// 异步地让 count 自增 +1
btnHandle3() {
// 触发 actions 的第一种方式
// 这里的 dispatch 函数,专门用来触发 action
this.$store.dispatch('addAsync')
},
btnHandle4() {
// 再调用 dispatch 函数,
// 触发 actions 时携带参数
this.$store.dispatch('addNAsync', 5)
}
}
}
</script>在
store/index.js可以这样使用:1
2
3
4
5
6
7
8
9
10
11
12
13
14
15
16
17
18
19
20
21
22
23
24
25
26
27
28
29
30
31
32
33
34
35
36
37
38
39
40
41
42
43
44
45import Vue from 'vue'
import Vuex from 'vuex'
Vue.use(Vuex)
export default new Vuex.Store({
state: {
count: 0
},
getters: {
},
// 只有 mutations 中定义的函数,才有权利修改 state 中的数据
mutations: {
add(state) {
// 变更状态
state.count++
},
addN(state, step) {
// 变更状态
state.count += step
},
sub(state) {
state.count--
},
subN(state, step) {
state.count -= step
}
},
actions: {
addAsync(context) {
setTimeout(() => {
// 在 actions 中不能直接修改 state 中的数据
// 必须通过 commit 去触发mutations的方式间接变更数据
context.commit('add')
}, 1000)
},
addNAsync(context, step) {
setTimeout(() => {
context.commit('addN', step)
}, 1000)
}
},
modules: {
}
})
触发 actions 的第二种方式
this.$store.dispatch() 是触发 actions 的第一种方式,触发 actions 的第二种方式如下:
1 | // 1. 从 vuex 中按需导入 mapActions 函数 |
通过刚才导入的 mapActions 函数,将需要的 actions 函数,映射为当前组件的 methods 方法:
1 | // 2. 将指定的 actions 函数,映射为当前组件的 methods 函数 |
比如在
store/index.js可以这样使用:1
2
3
4
5
6
7
8
9
10
11
12
13
14
15
16
17
18
19
20
21
22
23
24
25
26
27
28
29
30
31
32
33
34
35
36
37
38
39
40
41
42
43
44
45
46
47
48
49
50
51
52
53
54
55import Vue from 'vue'
import Vuex from 'vuex'
Vue.use(Vuex)
export default new Vuex.Store({
state: {
count: 0
},
getters: {
},
// 只有 mutations 中定义的函数,才有权利修改 state 中的数据
mutations: {
add(state) {
// 变更状态
state.count++
},
addN(state, step) {
// 变更状态
state.count += step
},
sub(state) {
state.count--
},
subN(state, step) {
state.count -= step
}
},
actions: {
addAsync(context) {
setTimeout(() => {
// 在 actions 中不能直接修改 state 中的数据
// 必须通过 commit 去触发mutations的方式间接变更数据
context.commit('add')
}, 1000)
},
addNAsync(context, step) {
setTimeout(() => {
context.commit('addN', step)
}, 1000)
},
subAsync(context) {
setTimeout(() => {
context.commit('sub')
}, 1000)
},
subNAsync(context, step) {
setTimeout(() => {
context.commit('subN', step)
}, 1000)
}
},
modules: {
}
})在减法组件
MySubtraction.vue可以这样使用:1
2
3
4
5
6
7
8
9
10
11
12
13
14
15
16
17
18
19
20
21
22
23
24
25
26
27
28
29
30
31
32
33
34
35
36
37
38
39
40
41
42
43
44<template>
<div>
<h3>当前最新的count值为:{{count}}</h3>
<button @click="btnHandle1">-1</button>
<button @click="btnHandle2">-N</button>
<button @click="btnHandle3">-1 Async</button>
<button @click="btnHandle4">-N Async</button>
</div>
</template>
<script>
// 1. 从 vuex 中按需导入 mapState 函数
// 1. 从 vuex 中按需导入 mapMutations 函数
// 1. 从 vuex 中按需导入 mapActions 函数
import { mapState, mapMutations, mapActions } from 'vuex'
export default {
data() {
return {}
},
// 2. 将全局数据,映射为当前组件的计算属性
computed: {
...mapState(['count'])
},
// 2. 将指定的 mutations 函数,映射为当前组件的 methods 函数
// 2. 将指定的 actions 函数,映射为当前组件的 methods 函数
methods: {
...mapMutations(['sub', 'subN']),
...mapActions(['subAsync', 'subNAsync']),
btnHandle1() {
this.sub()
},
btnHandle2() {
this.subN(3)
},
btnHandle3() {
this.subAsync()
},
btnHandle4() {
this.subNAsync(5)
}
}
}
</script>甚至是直接在按钮上调用函数:
1
2
3
4
5
6
7
8
9
10
11
12
13
14
15
16
17
18
19
20
21
22
23
24
25
26
27
28
29
30
31
32
33
34
35
36<template>
<div>
<h3>当前最新的count值为:{{count}}</h3>
<!-- <button @click="btnHandle1">-1</button> -->
<!-- <button @click="btnHandle2">-N</button> -->
<!-- <button @click="btnHandle3">-1 Async</button> -->
<!-- <button @click="btnHandle4">-N Async</button> -->
<button @click="sub()">-1</button>
<button @click="subN(3)">-N</button>
<button @click="subAsync">-1 Async</button>
<button @click="subNAsync(5)">-N Async</button>
</div>
</template>
<script>
// 1. 从 vuex 中按需导入 mapState 函数
// 1. 从 vuex 中按需导入 mapMutations 函数
// 1. 从 vuex 中按需导入 mapActions 函数
import { mapState, mapMutations, mapActions } from 'vuex'
export default {
data() {
return {}
},
// 2. 将全局数据,映射为当前组件的计算属性
computed: {
...mapState(['count'])
},
// 2. 将指定的 mutations 函数,映射为当前组件的 methods 函数
// 2. 将指定的 actions 函数,映射为当前组件的 methods 函数
methods: {
...mapMutations(['sub', 'subN']),
...mapActions(['subAsync', 'subNAsync'])
}
}
</script>
5. Getter
Getter 用于对 Store 中的数据进行加工处理形成新的数据。
- Getter 可以对 Store 中已有的数据加工处理之后形成新的数据,类似 Vue 的计算属性。
- Store 中数据发生变化,Getter 的数据也会跟着变化。
Getter 不会修改 Store 中的数据,只起到包装的作用
1 | // 定义 Getter |
使用 getters 的第一种方式:
1 | this.$store.getters.名称 |
- 比如在加法组件
MyAddition.vue可以这样使用:1
2
3
4
5
6
7
8
9
10<template>
<div>
<!-- <h3>当前最新的count值为:{{$store.state.count}}</h3> -->
<h3>{{$store.getters.showNum}}</h3>
<button @click="btnHandle1">+1</button>
<button @click="btnHandle2">+N</button>
<button @click="btnHandle3">+1 Async</button>
<button @click="btnHandle4">+N Async</button>
</div>
</template>
使用 getters 的第二种方式:
1 | import { mapGetters } from 'vuex' |
- 比如在减法组件
MySubtraction.vue可以这样使用:1
2
3
4
5
6
7
8
9
10
11
12
13
14
15
16
17
18
19
20
21
22
23
24
25
26
27
28
29
30
31
32
33
34
35
36
37
38
39
40
41
42
43
44
45
46
47
48
49
50<template>
<div>
<!-- <h3>当前最新的count值为:{{count}}</h3> -->
<h3>{{showNum}}</h3>
<button @click="btnHandle1">-1</button>
<button @click="btnHandle2">-N</button>
<button @click="btnHandle3">-1 Async</button>
<button @click="btnHandle4">-N Async</button>
<!-- <button @click="sub()">-1</button> -->
<!-- <button @click="subN(3)">-N</button> -->
<!-- <button @click="subAsync">-1 Async</button> -->
<!-- <button @click="subNAsync(5)">-N Async</button> -->
</div>
</template>
<script>
// 1. 从 vuex 中按需导入 mapState 函数
// 1. 从 vuex 中按需导入 mapMutations 函数
// 1. 从 vuex 中按需导入 mapActions 函数
import { mapState, mapMutations, mapActions, mapGetters } from 'vuex'
export default {
data() {
return {}
},
// 2. 将全局数据,映射为当前组件的计算属性
computed: {
...mapState(['count']),
...mapGetters(['showNum'])
},
// 2. 将指定的 mutations 函数,映射为当前组件的 methods 函数
// 2. 将指定的 actions 函数,映射为当前组件的 methods 函数
methods: {
...mapMutations(['sub', 'subN']),
...mapActions(['subAsync', 'subNAsync']),
btnHandle1() {
this.sub()
},
btnHandle2() {
this.subN(3)
},
btnHandle3() {
this.subAsync()
},
btnHandle4() {
this.subNAsync(5)
}
}
}
</script>
基于 Vuex 的案例
Todos
1. 初始化项目
【详情】通过 vue ui 命令打开可视化面板,创建新项目
vuex-demo2【预设】选择手动配置
【功能】选择
Bable、Vuex、Linter / Formatter、Use config files【配置】版本可以选
Vue2.x;Pick a linter / formatter config选择标准的配置文件ESLint + Standard config创建项目,不用保存预设。耐心等待它下载npm包。
通过可视化面板安装运行依赖:
axios然后在项目根目录新建终端,使用命令手动安装
npm install ant-design-vue@1.7.8 -S
用可视化面板安装的包3.2.11,与视频教程中的版本1.3.10在引入时都会报错,换成1.7.8版本能正常使用打开
main.js1
2
3
4
5
6
7
8
9
10import Vue from 'vue'
import App from './App.vue'
import store from './store'
Vue.config.productionTip = false
new Vue({
store,
render: h => h(App)
}).$mount('#app')全部删除,替换成:
1
2
3
4
5
6
7
8
9
10
11
12
13
14
15import Vue from 'vue'
import App from './App.vue'
// 1. 导入 ant-design-vue 组件库
import Antd from 'ant-design-vue'
// 2. 导入组件库的样式表
import 'ant-design-vue/dist/antd.css'
Vue.config.productionTip = false
// 3. 安装组件库
Vue.use(Antd)
new Vue({
render: h => h(App)
}).$mount('#app')打开根组件
App.vue,实现 Todos 基本布局(基于已有样式模板)1
2
3
4
5
6
7
8
9
10
11
12
13
14
15
16
17
18
19
20
21
22
23
24
25
26
27
28
29
30
31
32
33
34
35
36
37
38
39
40
41
42
43
44
45
46
47
48
49
50
51
52
53
54
55
56
57
58
59
60
61
62
63
64
65
66
67
68
69
70
71
72
73
74
75
76<template>
<div id="app">
<a-input placeholder="请输入任务" class="my_ipt" />
<a-button type="primary">添加事项</a-button>
<a-list bordered :dataSource="list" class="dt_list">
<a-list-item slot="renderItem" slot-scope="item">
<!-- 复选框 -->
<a-checkbox>{{item.info}}</a-checkbox>
<!-- 删除链接 -->
<a slot="actions">删除</a>
</a-list-item>
<!-- footer区域 -->
<div slot="footer" class="footer">
<!-- 未完成的任务个数 -->
<span>0条剩余</span>
<!-- 操作按钮 -->
<a-button-group>
<a-button type="primary">全部</a-button>
<a-button type="default">未完成</a-button>
<a-button type="default">已完成</a-button>
</a-button-group>
<!-- 把已经完成的任务清空 -->
<a>清除已完成</a>
</div>
</a-list>
</div>
</template>
<script>
export default {
name: 'app',
data () {
return {
list: [
{
id: 0,
info: 'Racing car sprays burning fuel into crowd.',
done: false
},
{ id: 1, info: 'Japanese princess to wed commoner.', done: false },
{
id: 2,
info: 'Australian walks 100km after outback crash.',
done: false
},
{ id: 3, info: 'Man charged over missing wedding girl.', done: false },
{ id: 4, info: 'Los Angeles battles huge wildfires.', done: false }
]
}
}
}
</script>
<style scoped>
#app {
padding: 10px;
}
.my_ipt {
width: 500px;
margin-right: 10px;
}
.dt_list {
width: 500px;
margin-top: 10px;
}
.footer {
display: flex;
justify-content: space-between;
align-items: center;
}
</style>运行并启动项目
在
.eslintrc.js的代码检查rules中添加一行规则,停止项目,重新运行1
2
3
4
5rules: {
'no-console': process.env.NODE_ENV === 'production' ? 'warn' : 'off',
'no-debugger': process.env.NODE_ENV === 'production' ? 'warn' : 'off',
'space-before-function-paren': 0 //函数参数前的空格
}在项目根目录创建格式化工具的配置文件
.prettierrc.js1
2
3
4
5
6
7
8
9module.exports = {
semi: false, //不使用分号
singleQuote: true, //使用单引号
bracketSpacing: true, //括号内部不要出现空格
useTabs: false, //使用 tab 缩进
tabWidth: 2, //缩进空格数
trailingComma: 'none', //末尾逗号
printWidth: 1000, //行宽,超过这个数值才换行。否则默认每个标签属性单独占一行
}
2. 导入并挂载store
1 | import Vue from 'vue' |
3. 完成具体功能
- 动态加载任务列表数据
- 实现文本框与store数据的双向同步
- 完成添加任务事项的操作
- 完成删除任务事项的操作
- 动态绑定复选框的选中状态
- 修改任务事项的完成状态
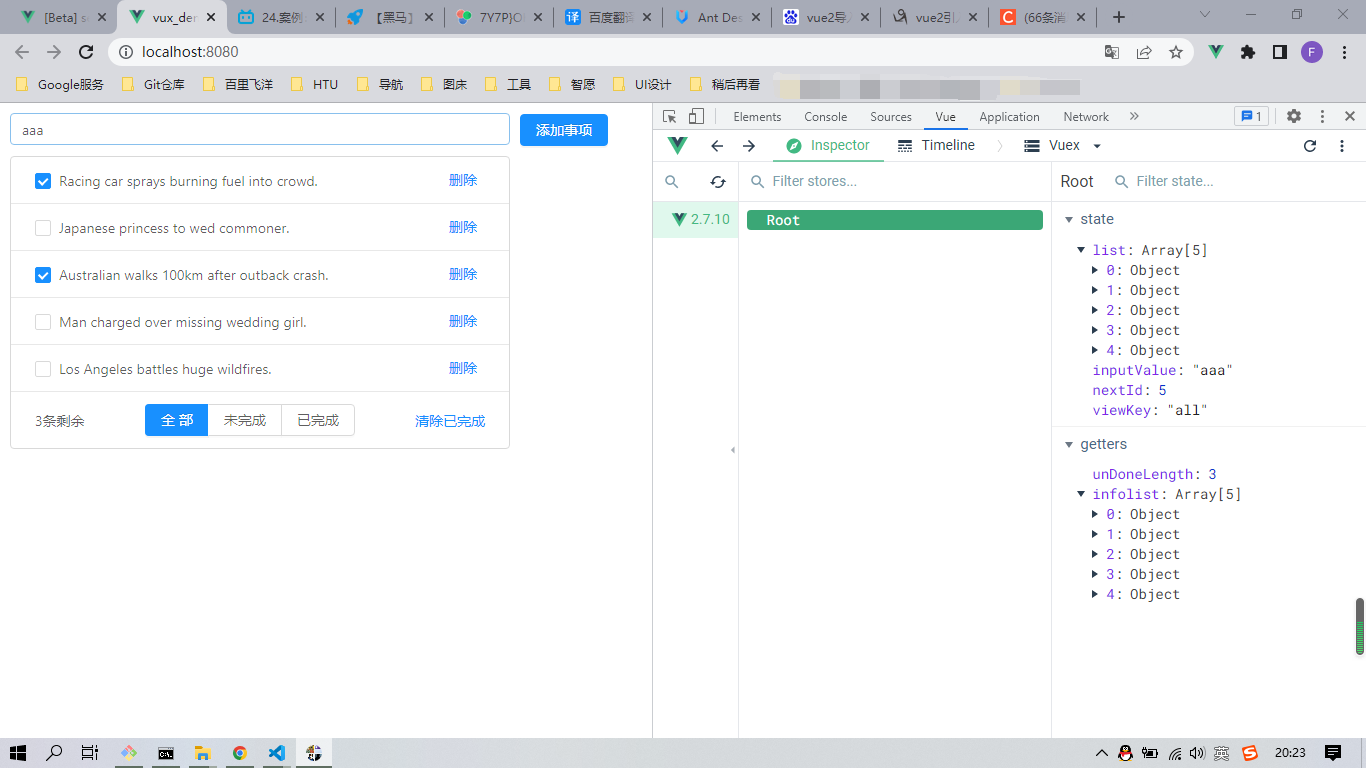
- 统计未完成的任务的条数
- 清除已完成的任务事项
- 实现任务列表数据的动态切
main.js代码如下:1
2
3
4
5
6
7
8
9
10
11
12
13
14
15
16
17
18import Vue from 'vue'
import App from './App.vue'
// 1. 导入 ant-design-vue 组件库
import Antd from 'ant-design-vue'
// 2. 导入组件库的样式表
import 'ant-design-vue/dist/antd.css'
import store from './store'
Vue.config.productionTip = false
// 3. 安装组件库
Vue.use(Antd)
new Vue({
render: h => h(App),
store
}).$mount('#app')
App.vue代码如下:1
2
3
4
5
6
7
8
9
10
11
12
13
14
15
16
17
18
19
20
21
22
23
24
25
26
27
28
29
30
31
32
33
34
35
36
37
38
39
40
41
42
43
44
45
46
47
48
49
50
51
52
53
54
55
56
57
58
59
60
61
62
63
64
65
66
67
68
69
70
71
72
73
74
75
76
77
78
79
80
81
82
83
84
85
86
87
88
89
90
91
92
93
94
95
96
97
98
99
100
101
102
103
104
105
106
107
108
109
110
111
112
113
114<template>
<div id="app">
<a-input placeholder="请输入任务" class="my_ipt" :value="inputValue" @change="handleInputChange" />
<a-button type="primary" @click="addItemToList">添加事项</a-button>
<a-list bordered :dataSource="infolist" class="dt_list">
<a-list-item slot="renderItem" slot-scope="item">
<!-- 复选框 -->
<a-checkbox :checked="item.done" @change="(e) => {cbStatusChanged(e, item.id)}">{{item.info}}</a-checkbox>
<!-- 删除链接 -->
<a slot="actions" @click="removeItemById(item.id)">删除</a>
</a-list-item>
<!-- footer区域 -->
<div slot="footer" class="footer">
<!-- 未完成的任务个数 -->
<span>{{unDoneLength}}条剩余</span>
<!-- 操作按钮 -->
<a-button-group>
<a-button :type="viewKey === 'all' ? 'primary' : 'default'" @click="changeList('all')">全部</a-button>
<a-button :type="viewKey === 'undone' ? 'primary' : 'default'" @click="changeList('undone')">未完成</a-button>
<a-button :type="viewKey === 'done' ? 'primary' : 'default'" @click="changeList('done')">已完成</a-button>
</a-button-group>
<!-- 把已经完成的任务清空 -->
<a @click="clean">清除已完成</a>
</div>
</a-list>
</div>
</template>
<script>
import { mapState, mapGetters } from 'vuex'
export default {
name: 'app',
data() {
return {
}
},
created() {
this.$store.dispatch('getList')
},
computed: {
...mapState(['list', 'inputValue', 'viewKey']),
...mapGetters(['unDoneLength', 'infolist'])
},
methods: {
// 监听文本框内容变化
handleInputChange(e) {
// 拿到最新的值
// console.log(e.target.value)
// 通过mutations修改store中的值
this.$store.commit('setInputValue', e.target.value)
},
// 向列表中新增 item 项
addItemToList() {
if (this.inputValue.trim().length <= 0) {
return this.$message.warning('文本框内容不能为空!')
}
this.$store.commit('addItem')
},
// 根据Id删除对应的任务事项
removeItemById(id) {
// console.log(id)
this.$store.commit('removeItem', id)
},
// 监听复选框选中状态变化的事件
cbStatusChanged(e, id) {
// 拿到复选框最新状态false/true
console.log(e.target.checked)
// console.log(id)
const param = {
id: id,
status: e.target.checked
}
this.$store.commit('changeStatus', param)
},
// 清除已完成的任务
clean() {
this.$store.commit('cleanDone')
},
// 修改页面上展示的列表数据
changeList(key) {
// console.log(key)
this.$store.commit('changeViewKey', key)
}
}
}
</script>
<style scoped>
#app {
padding: 10px;
}
.my_ipt {
width: 500px;
margin-right: 10px;
}
.dt_list {
width: 500px;
margin-top: 10px;
}
.footer {
display: flex;
justify-content: space-between;
align-items: center;
}
</style>
store/index.js代码如下:1
2
3
4
5
6
7
8
9
10
11
12
13
14
15
16
17
18
19
20
21
22
23
24
25
26
27
28
29
30
31
32
33
34
35
36
37
38
39
40
41
42
43
44
45
46
47
48
49
50
51
52
53
54
55
56
57
58
59
60
61
62
63
64
65
66
67
68
69
70
71
72
73
74
75
76
77
78
79
80
81
82
83
84
85
86
87
88
89
90
91
92
93import Vue from 'vue'
import Vuex from 'vuex'
import axios from 'axios'
Vue.use(Vuex)
export default new Vuex.Store({
state: {
// 所有的任务列表
list: [],
// 文本框的内容
inputValue: 'aaa',
// 下一个Id
nextId: 5,
// 展示的列表类型
viewKey: 'all'
},
getters: {
// 统计未完成的任务的条数
unDoneLength(state) {
// 按条件过滤,返回值是数组
return state.list.filter(x => x.done === false).length
},
infolist(state) {
if (state.viewKey === 'all') {
return state.list
}
if (state.viewKey === 'undone') {
return state.list.filter(x => x.done === false)
}
if (state.viewKey === 'done') {
return state.list.filter(x => x.done === true)
}
}
},
mutations: {
initList(state, list) {
state.list = list
},
// 为 store 中的 inputValue 赋值
setInputValue(state, val) {
state.inputValue = val
},
// 添加列表项目
addItem(state) {
const obj = {
id: state.nextId,
info: state.inputValue.trim(),
done: false
}
state.list.push(obj)
state.nextId++
state.inputValue = ''
},
// 根据Id删除对应的任务事项
removeItem(state, id) {
// 根据Id查找对应项的索引
const i = state.list.findIndex(x => x.id === id)
// 根据索引,删除对应的元素
if (i !== -1) {
state.list.splice(i, 1)
}
},
// 修改列表项的选中状态
changeStatus(state, param) {
const i = state.list.findIndex(x => x.id === param.id)
if (i !== -1) {
state.list[i].done = param.status
}
},
// 清除已完成的任务
cleanDone(state) {
// 按条件过滤
state.list = state.list.filter(x => x.done === false)
},
// 修改视图的关键字
changeViewKey(state, key) {
state.viewKey = key
}
},
actions: {
getList(context) {
axios.get('./list.json').then(({ data }) => {
// console.log(data)
// 在 actions 中的函数只能通过 mutations 函数间接操作 state 中的值
context.commit('initList', data)
})
}
},
modules: {
}
})
【参考内容】:
 WeChat微信打赏
- AliPay支付宝打赏