
【黑马】Vue全家桶-组件化开发(学习打卡04)
本文标题中的数字表示B站视频内容对应的分P数。
【组件化开发思想】
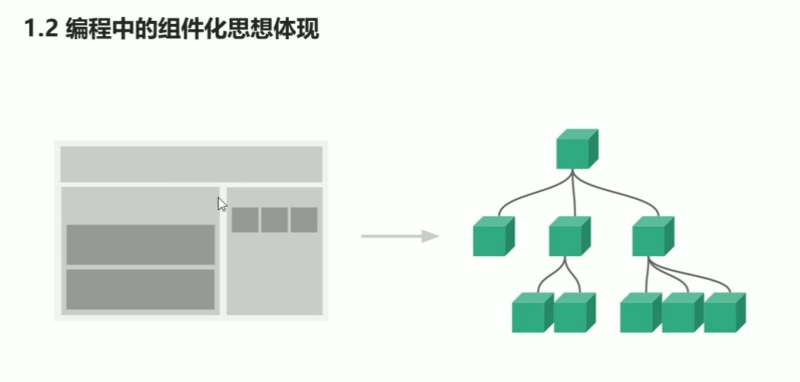
现实中的组件化思想体现:标准、分治、重用、组合
编程中的组件化思想体现

组件化规范: Web Components(了解一下即可,很多浏览器不支持)
- 我们希望尽可能多的重用代码,但自定义组件的方式不太容易(html、css和js),并且多次使用组件可能导致冲突。
- Web Components 通过创建封装好功能的定制元素解决上述问题.
- Vue部分实现了上述规范
【组件的注册和使用】
1.全局组件注册语法
语法:
1
2
3
4
Vue.component(组件名称, {
data: 组件数据,
template: 组件模板内容
})示例:
1
2
3
4
5
6
7
8
9
// 注册一个名为 button-counter 的新组件
Vue.component('button-counter', {
data: function () {
return {
count: 0
}
},
template: '<button v-on:click="count++">点击了{{ count }}次.</button>'
})
2.组件用法
1 |
|
3.组件注册注意事项
- data必须是一个函数(而Vue实例的data是一个对象)
- 分析函数与普通对象的对比
保证每个组件的数据是相互独立的
- 分析函数与普通对象的对比
- 组件模板内容必须是单个根元素(而不能是两个并列的标签)
- 分析演示实际的效果
1
2
3
4
5
6
7
8
9
10
11
12
13
14
15
16Vue.component('button-counter', {
data: function(){
return {
count: 0
}
},
//两标签并列,报错
//template: '<button @click="handle">点击了{{count}}次</button><button>测试</button>',
//外面包一个div,形成一个根元素,不报错
template: '<div><button @click="handle">点击了{{count}}次</button><button>测试</button></div>',
methods: {
handle: function(){
this.count += 2;
}
}
})
- 分析演示实际的效果
- 组件模板内容可以是模板字符串
- 模板字符串需要浏览器提供支持(ES6语法)
1
2
3
4
5
6
7
8
9
10
11
12
13
14
15
16
17
18
19Vue.component('button-counter', {
data: function(){
return {
count: 0
}
},
//若模板内容复杂,就用模板字符串的方式进行处理,反引号包起来
template: `
<div>
<button @click="handle">点击了{{count}}次</button>
<button>测试123</button>
</div>
`,
methods: {
handle: function(){
this.count += 2;
}
}
})
- 模板字符串需要浏览器提供支持(ES6语法)
- 组件命名方式
- 短横线方式(推荐)
1
Vue.component('my-component', { /* ... */ })
- 驼峰方式 注意:驼峰命名组件,只能用于模板字符串中,否则直接用在页面中Vue里会报错,必须使用短横线的方式使用。
1
Vue.component('MyComponent', { /* ... */ })
- 示例:
1
2
3
4
5
6
7
8
9
10
11
12
13
14
15
16
17
18
19
20
21
22
23
24
25
26
27
28
29
30
31
32
33
34
35
36
37
38
39
40
41
42
43
44
45
46
47
48
49
50
51
52
53
54
<html lang="en">
<head>
<meta charset="UTF-8">
<title>Document</title>
</head>
<body>
<div id="app">
<button-counter></button-counter>
<hello-world></hello-world>
</div>
<script type="text/javascript" src="js/vue.js"></script>
<script type="text/javascript">
/*
组件注册注意事项
如果使用驼峰式命名组件,那么在使用组件的时候,只能在字符串模板中用驼峰的方式使用组件,但是
在普通的标签模板中,必须使用短横线的方式使用组件
*/
Vue.component('HelloWorld', {
data: function(){
return {
msg: 'HelloWorld'
}
},
template: '<div>{{msg}}</div>'
});
Vue.component('button-counter', {
data: function(){
return {
count: 0
}
},
template: `
<div>
<button @click="handle">点击了{{count}}次</button>
<button>测试123</button>
<HelloWorld></HelloWorld>
</div>
`,
methods: {
handle: function(){
this.count += 2;
}
}
})
var vm = new Vue({
el: '#app',
data: {
}
});
</script>
</body>
</html>
- 短横线方式(推荐)
4.局部组件注册
就是在Vue组件之中引入一个额外的属性components,它里面可以注册一系列的局部组件
局部组件只能在父组件中使用
1 | // 组件内容可以抽取到对象当中,和全局组件Vue.component第二个参数是类似的 |
- 示例:
1
2
3
4
5
6
7
8
9
10
11
12
13
14
15
16
17
18
19
20
21
22
23
24
25
26
27
28
29
30
31
32
33
34
35
36
37
38
39
40
41
42
43
44
45
46
47
48
49
50
51
52
53
54
55
56
57
58
59
60
<html lang="en">
<head>
<meta charset="UTF-8">
<title>Document</title>
</head>
<body>
<div id="app">
<hello-world></hello-world>
<hello-tom></hello-tom>
<hello-jerry></hello-jerry>
<test-com></test-com>
</div>
<script type="text/javascript" src="js/vue.js"></script>
<script type="text/javascript">
/*
局部组件注册
局部组件只能在注册他的父组件中使用
*/
Vue.component('test-com',{
template: '<div>Test<hello-world></hello-world></div>'
});
var HelloWorld = {
data: function(){
return {
msg: 'HelloWorld'
}
},
template: '<div>{{msg}}</div>'
};
var HelloTom = {
data: function(){
return {
msg: 'HelloTom'
}
},
template: '<div>{{msg}}</div>'
};
var HelloJerry = {
data: function(){
return {
msg: 'HelloJerry'
}
},
template: '<div>{{msg}}</div>'
};
var vm = new Vue({
el: '#app',
data: {
},
components: {
'hello-world': HelloWorld,
'hello-tom': HelloTom,
'hello-jerry': HelloJerry
}
});
</script>
</body>
</html>
【Vue调试工具】Devtools
vue-dev-tools是一款可以方便我们在浏览器调试我们vue项目的工具
工具地址:Vue官网右上角“生态系统”下拉菜单的Devtools工具
项目仓库:https://github.com/vuejs/devtools
使用文档:https://devtools.vuejs.org/
1.调试工具安装
视频教程中给的安装步骤是如下六步,
我先说好,我照着试了不管用,因为第二步npm install安装依赖包的时候,因为版本问题报错!!!
- 克隆仓库
- 在vue-devtools目录下安装依赖包
2
3
npm install //下载依赖(报错解决方法看下面)
//使用npm需科学上网,或者cnpm国内镜像下载更快- 构建
- 打开Chrome扩展页面
- 选中开发者模式
- 加载已解压的扩展,选择shells/chrome
那既然这种方法行不通,最后我怎么解决的?
我把我的踩坑过程记录下来了:安装Vue调试工具Devtools踩的坑
忙活小半天,最后用的同学给我的压缩包,才安装成功…
2.调试工具用法
打开下方页面,浏览器打开控制台,往后拉就可以看到Vue调试工具了:
1 |
|
【组件间的数据交互】(P60~65)
1.父组件向子组件传值
(1)组件内部通过props接收传递值
引入一个新的属性props,用来接受从父组件传递过来的数据,值是数组。
传过来后,我们在模板template中就能使用这个属性了。
1 | // 子组件 |
(2)父组件通过属性传值给子组件
1 | // 1. 静态写死的方式,通过属性传递 |
- 示例:
1
2
3
4
5
6
7
8
9
10
11
12
13
14
15
16
17
18
19
20
21
22
23
24
25
26
27
28
29
30
31
32
33
34
35
36
37
38
39
40
41
<html lang="en">
<head>
<meta charset="UTF-8">
<title>Document</title>
</head>
<body>
<div id="app">
<!-- 子组件本身的数据 -->
<div>{{pmsg}}</div>
<!-- 1. 静态写死,通过属性传递 来自父组件的值 -->
<menu-item title='来自父组件的值'></menu-item>
<!-- 2. 动态绑定属性的方式 -->
<menu-item :title='ptitle' content='hello'></menu-item>
</div>
<script type="text/javascript" src="js/vue.js"></script>
<script type="text/javascript">
/*
父组件向子组件传值-基本使用
*/
Vue.component('menu-item', {
props: ['title', 'content'],
data: function() {
return {
msg: '子组件本身的数据'
}
},
template: '<div>{{msg + "----" + title + "-----" + content}}</div>'
});
var vm = new Vue({
el: '#app',
data: {
pmsg: '父组件中内容',
ptitle: '动态绑定属性'
}
});
</script>
</body>
</html>
(3)props属性名规则
- 在props中使用驼峰形式,模板中需要使用短横线的形式
- 字符串形式的模板中没有这个限制
1 | Vue.component(‘menu-item', { |
(4)props属性值类型
- 字符串 String
- 数值 Number
- 布尔值 Boolean
- 数组 Array
- 对象 Object
这一部分没看太懂,视频指路→父组件向子组件传值-props属性值类型
1 |
|
2.子组件向父组件传值
props传递参数原则:单向数据流
意思是只允许父组件向子组件传递数据,不允许子组件向父组件传递数据
所以子组件向父组件传递信息最好不要用props
(1)子组件通过自定义事件向父组件传递信息
1 | <!-- |
(2)父组件监听子组件的事件
1 | <!-- |
(3)子组件通过自定义事件向父组件传递信息(携带参数)
1 | <!-- |
(4)父组件监听子组件的事件(携带参数)
1 | <!-- |
3.非父子组件间传值
兄弟组件之间无法直接交互,须通过“事件中心”来进行通信。
(1)设置单独的事件中心管理组件间的通信
1 | // 新建一个Vue实例当事件中心 |
(2)监听事件与销毁事件
1 | // 监听事件('事件名称',事件函数) |
(3)触发事件
1 | // 触发事件('事件名称', 携带的参数比如id) |
示例:
1 |
|
【组件插槽】(P66~68)
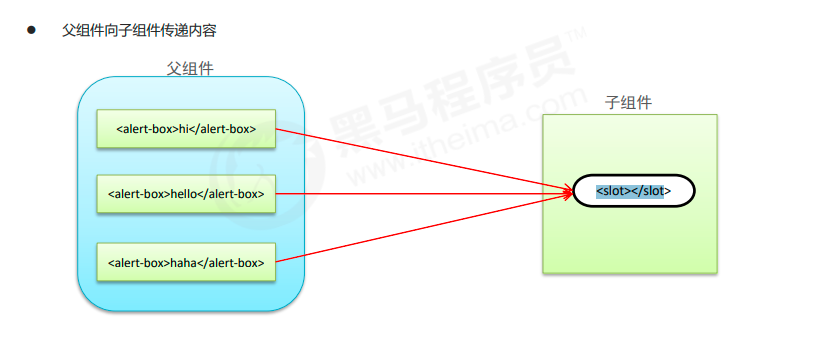
1.组件插槽的作用
组件的最大特性就是复用性,而用好插槽能大大提高组件的可复用能力.
- 父组件向子组件传递内容
2.组件插槽基本用法
(1)插槽的位置
1 | Vue.component('alert-box', { |
(2)插槽内容
1 | <alert-box>Something bad happened.</alert-box> |
- 插槽基本用法示例:
1
2
3
4
5
6
7
8
9
10
11
12
13
14
15
16
17
18
19
20
21
22
23
24
25
26
27
28
29
30
31
32
33
34
<html lang="en">
<head>
<meta charset="UTF-8">
<title>Document</title>
</head>
<body>
<div id="app">
<alert-box>有bug发生</alert-box>
<alert-box>有一个警告</alert-box>
<alert-box></alert-box>
</div>
<script type="text/javascript" src="js/vue.js"></script>
<script type="text/javascript">
/*
组件插槽:父组件向子组件传递内容
*/
Vue.component('alert-box', {
template: `
<div>
<strong>ERROR:</strong>
<slot>默认内容</slot>
</div>
`
});
var vm = new Vue({
el: '#app',
data: {
}
});
</script>
</body>
</html>
上方演示的插槽没有名字(name值),可叫作匿名插槽。
3.具名插槽用法
就是有名字(name值)的插槽
(1)插槽定义
1 | <div class="container"> |
(2)插槽内容
可以定义多个插槽,会根据名称进行匹配,没匹配到/没名字的会填入默认值。
1 | <base-layout> |
- 具名插槽的使用方法:
1
2
3
4
5
6
7
8
9
10
11
12
13
14
15
16
17
18
19
20
21
22
23
24
25
26
27
28
29
30
31
32
33
34
35
36
37
38
39
40
41
42
43
44
45
46
47
48
49
50
51
52
53
54
55
56
57
<html lang="en">
<head>
<meta charset="UTF-8">
<title>Document</title>
</head>
<body>
<div id="app">
<base-layout>
<p slot='header'>标题信息</p>
<p>主要内容1</p>
<p>主要内容2</p>
<p slot='footer'>底部信息信息</p>
</base-layout>
<base-layout>
<template slot='header'>
<p>标题信息1</p>
<p>标题信息2</p>
</template>
<p>主要内容1</p>
<p>主要内容2</p>
<template slot='footer'>
<p>底部信息信息1</p>
<p>底部信息信息2</p>
</template>
</base-layout>
</div>
<script type="text/javascript" src="js/vue.js"></script>
<script type="text/javascript">
</script>
</body>
</html>
4.作用域插槽
应用场景:父组件对子组件的内容进行加工处理
(1)插槽定义
1 | <ul> |
(2)插槽内容
1 | <fruit-list v-bind:list= "list"> |
- 作用域插槽示例:
1
2
3
4
5
6
7
8
9
10
11
12
13
14
15
16
17
18
19
20
21
22
23
24
25
26
27
28
29
30
31
32
33
34
35
36
37
38
39
40
41
42
43
44
45
46
47
48
49
50
51
52
53
<html lang="en">
<head>
<meta charset="UTF-8">
<title>Document</title>
</head>
<style type="text/css">
.current {
color: orange;
}
</style>
<body>
<div id="app">
<fruit-list :list='list'>
<template slot-scope='slotProps'>
<strong v-if='slotProps.info.id==3' class="current">{{slotProps.info.name}}</strong>
<span v-else>{{slotProps.info.name}}</span>
</template>
</fruit-list>
</div>
<script type="text/javascript" src="js/vue.js"></script>
<script type="text/javascript">
{{item.name}}</slot>
</script>
</body>
</html>
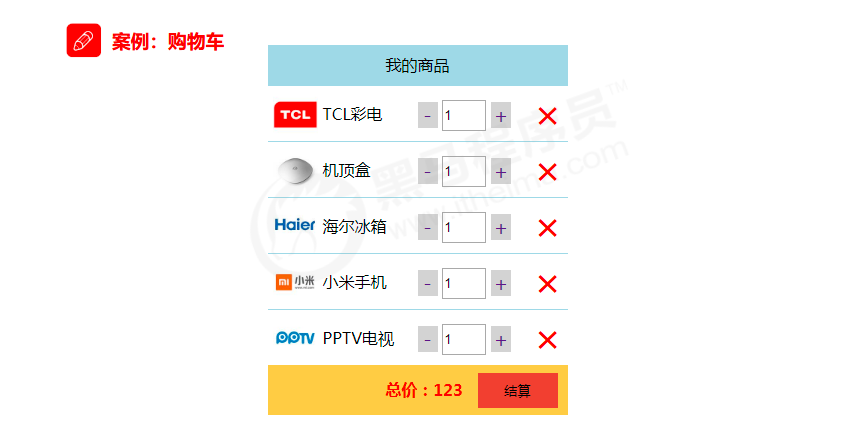
【基于组件的案例】(P69~74)
购物车案例:
代码素材:
1 |
|
1.需求分析
- 按照组件化方式实现业务需求
- 根据业务功能进行组件化划分
- 标题组件(展示文本)
- 列表组件(列表展示、商品数量变更、商品删除)
- 结算组件(计算商品总额)
- 根据业务功能进行组件化划分
将一个全局Vue组件拆分为多个局部子组件,以便于后续功能的一步步实现
拆分组件,实现组件化布局之后的代码:
1 |
|
2.实现步骤
- 功能实现步骤
- 实现整体布局和样式效果
- 划分独立的功能组件
- 组合所有的子组件形成整体结构
- 逐个实现各个组件功能
- 标题组件
- 列表组件
- 结算组
实现标题和结算组件功能,之后的代码:
1 | <div id="app"> |
实现列表组件删除和商品功能,之后的代码:
1 | <div id="app"> |
实现列表组件更新商品功能(商品数量的动态变更):
1 | <div id="app"> |
实现列表组件更新商品功能(加减号实现数量变更):
1 |
|
》案例中知识点总结
组件的模板内容
template:后面,要么是一行单引号包起来的单个根元素,要不然是反引号包起来的多行模板字符串父组件的数据属性
data: function(){ }必须是函数子组件接收父组件的数据值
props: [],须是数组,传过来后,在该子组件的模板template中就能使用这个属性了v-bind:可以缩写为冒号,绑定的是属性;v-on:可以缩写为@,绑定的是事件;分清单引号和反引号,注意中英文逗号
遍历数组时别忘了加
:key='item.id'或者:key='item.index'对于最后这个商品案例,删除操作要在父组件中进行处理
原则上,通过
props传来的父组件的数据我们不做修改,所以商品数量动态显示的实现方式,不采用v-model动态绑定,而是直接选择了属性绑定:value=''直接填充过来显示就可以在鼠标失去焦点时(@blur)变更商品数量,也不推荐在子组件中修改list数组的值,所以还是选择传递给父组件。传参时,
$event作为参数,可以把事件对象传递给函数。event.target.value()可获取当前文本框的值(由事件触发时)。可以去了解一下event.target是什么意思整理一下子组件传值给父组件,让父组件操作业务的逻辑(以变更商品数量的功能为例):
- 在子组件的template模板中设置监听事件
@blur='changeNum(item.id, $event)',其中 @blur 是当元素失去焦点时触发事件,触发的事件名称是changeNum(); - 然后在该子组件的methods函数方法中定义 changeNum() 函数为
changeNum: function(id, event){ this.$emit('change-num',{ 执行语句 } },其中$emit是为了让父组件监听到自定义事件,自定义事件的名称是change-num; - 之后父组件在父组件自己的template模板字符串中为子组件标签添加’change-num’自定义监听事件:
@change-num='changeNum($event)',其中changeNum()是指该子组件标签触发事件时执行的函数名称,另外$event是为了接收传过来的值。 - 最后在父组件methods函数方法中定义所执行的函数
changeNum: function(val){ 执行语句 },其中val表示第二步传过来那俩参数和值(id, event)。
- 在子组件的template模板中设置监听事件
我发现很多操作都是让子组件传值给父组件,让父组件执行,而不是子组件自己修改数据。
- vue2.0 子组件props接受父组件传递的值,能不能修改的问题整理
- vue 子组件为何不可以修改父组件传递的值?
- 总之:vue设计是单向数据流,数据的流动方向只能是自上往下的方向;父子组件传值时,父组件传递的参数,数组和对象,子组件接受之后可以直接进行修改,并且会传递给父组件相应的值也会修改。如果传递的值是字符串,直接修改会报错。综上,不推荐子组件直接修改父组件中的参数,避免这个参数多个子组件引用,无法找到造成数据不正常的原因。
可能是第一次用组件的思维写代码,父子组件数据交互还是听着有点糊涂,尤其是子组件传给父组件的时候,光函数就好几个:
- 子组件的事件监听函数、执行函数,
- 父组件的事件监听函数、执行函数…
特别感谢:
- VUE全家桶之VUE基础(P53~74)
- Vue.js 3.0 中文文档(新版)
- Vue.js 2.x 中文文档组合
- WeChat微信打赏
- AliPay支付宝打赏