【Three.js】走进3D的奇妙世界(学习打卡04)
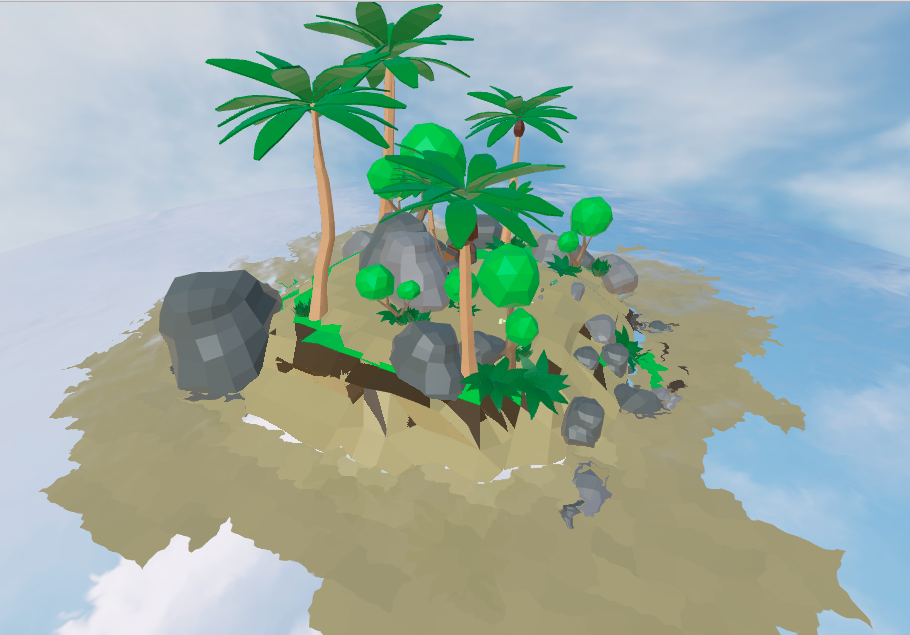
开发案例:水天一色小岛
项目初始化
1. 创建并配置项目
使用可视化面板创建项目:
- 功能选择:
Bable、Router、CSS Pre-processors、Linter / Formatter、Use config files - 配置选择:
2.x、Less、ESLint + Standard config
创建代码格式化配置文件.prettierrc.js:
1 | module.exports = { |
在代码审查配置文件.eslintrc.js中添加一行规则:
1 | rules: { |
创建全局css样式文件/src/assets/css/global.css:
1 | /* 全局样式表 */ |
在/src/main.js中导入全局样式文件:
1 | import Vue from 'vue' |
2. 初始化页面
在可视化面板中安装运行依赖three,初始化App.vue:
1 | <template> |
本次项目虽然也是用的
Vue2.x,但我这次尝试舍弃data(),将three.js的场景/摄像机/渲染器/控制器等都放在mounted()中。一个原因是我看到好几篇文章都提到放在data中会导致项目运行使用卡顿,另一个原因是提早适应Vue3.x的书写逻辑。
运行并启动项目,开始开发。
场景搭建
天空球
创建天空球
1
2
3
4
5
6
7
8
9// 创建一个巨大的天空球
const texture = new THREE.TextureLoader().load('./textures/sky.jpg') // 天空纹理
const skyGeometry = new THREE.SphereGeometry(1000, 60, 60) // 半径、细分程度
const skyMaterial = new THREE.MeshBasicMaterial({
map: texture
})
skyGeometry.scale(1, 1, -1) // 将几何体内外翻转颠倒过来(否则球内是黑的,只有球外是亮的)
const sky = new THREE.Mesh(skyGeometry, skyMaterial)
this.scene.add(sky)创建视频纹理(如果监听的事件是鼠标移动
mousemove,需要设置自动播放video.muted = true,否则浏览器可能因为鼠标移动不算用户与网页交互,从而无法执行音视频播放)1
2
3
4
5
6
7
8
9
10
11
12
13
14
15// 创建视频纹理
const video = document.createElement('video')
video.src = './textures/sky.mp4'
video.loop = true // 循环播放
// video.muted = true // 自动播放
// 监听鼠标事件播放视频
window.addEventListener('click', (e) => {
// window.addEventListener('mousemove', (e) => {
// 判断当前是否处于播放状态
if (video.paused) {
video.play()
skyMaterial.map = new THREE.VideoTexture(video)
skyMaterial.map.needsUpdate = true
}
})
水面
- 创建水面
1
2
3
4
5
6
7
8
9
10
11
12
13
14// 导入水面
import { Water } from 'three/examples/jsm/objects/Water2'
// 创建水面(平面圆形几何体)
const waterGeometry = new THREE.CircleGeometry(300, 64) // 半径、细分程度
const water = new Water(waterGeometry, {
textureWidth: 1024, // 纹理宽度(细分程度)
textureHeight: 1024, // 纹理高度(细分程度)
color: 0xeeeeff, // 水面颜色
flowDirection: new THREE.Vector2(1, 1), // 水面流动方向
scale: 1 // 水面波纹大小
})
water.rotation.x = -Math.PI / 2 // 将水面从竖直旋转至水平
this.scene.add(water)
小岛
- 添加小岛模型
1
2
3
4
5
6
7
8
9
10
11
12
13
14
15// 导入glTF载入库
import { GLTFLoader } from 'three/examples/jsm/loaders/GLTFLoader'
// 导入Draco载入库(用于解压模型)
import { DRACOLoader } from 'three/examples/jsm/loaders/DRACOLoader'
// 添加小岛模型
const loader = new GLTFLoader() // 实例化glTF载入库
const dracoLoader = new DRACOLoader() // 实例化Draco载入库
dracoLoader.setDecoderPath('./draco/') // 添加Draco载入库
loader.setDRACOLoader(dracoLoader) // 将loader和解压的码放在一起
// 加载模型
loader.load('./model/island2.glb', (gltf) => {
this.scene.add(gltf.scene)
})
场景调整
导入场景HDR纹理
- 现在小岛是纯黑色的,需要载入hdr环境纹理
1
2
3
4
5
6
7
8
9
10
11// 导入RGBELoader,用于导入hdr图
import { RGBELoader } from 'three/examples/jsm/loaders/RGBELoader'
// 载入环境纹理hdr
const hdrLoader = new RGBELoader()
// 异步导入
hdrLoader.loadAsync('./assets/050.hdr').then((texture) => {
texture.mapping = THREE.EquirectangularReflectionMapping // 球面映射
this.scene.background = texture // 场景背景
this.scene.environment = texture // 场景环境
})
添加平行光
- 如果认为场景不够亮,可以添加一个平行光,相当于太阳光
1
2
3
4// 导入平行光
const light = new THREE.DirectionalLight(0xffffff, 1)
light.position.set(-100, 100, 10)
this.scene.add(light)
提高水平面
- 将水平面提高3米,没过小岛模型沙滩边缘
1
2
3
4
5
6
7
8
9
10
11
12// 创建水面(平面圆形几何体)
const waterGeometry = new THREE.CircleGeometry(300, 64) // 半径、细分程度
const water = new Water(waterGeometry, {
textureWidth: 1024, // 纹理宽度(细分程度)
textureHeight: 1024, // 纹理高度(细分程度)
color: 0xeeeeff, // 水面颜色
flowDirection: new THREE.Vector2(1, 1), // 水面流动方向
scale: 1 // 水面波纹大小
})
water.rotation.x = -Math.PI / 2 // 将水面从竖直旋转至水平
water.position.y = 3 // 将水平面提高3米,没过小岛模型沙滩边缘
this.scene.add(water)
对数深度缓冲区
- 模型在旋转的时候部分面会闪烁,是由于模型有太多的面,可能靠得很近,渲染的时候不知道渲染哪一个。可以对渲染器设置对数深度缓冲区
logarithmicDepthBuffer1
2
3
4
5
6
7// 初始化渲染器
this.renderer = new THREE.WebGLRenderer({
antialias: true, // 设置抗锯齿
logarithmicDepthBuffer: true // 对数深度缓冲区
})
this.renderer.outputEncoding = THREE.sRGBEncoding // 设置渲染输出环境的编码,使画面更好看
this.renderer.setSize(window.innerWidth, window.innerHeight) // 设置渲染的宽高尺寸大小
完整Vue代码
1 | <template> |
【参考内容】:
-
scene和camera等不要放在data里面,要在mounted时初始化,beforeDestroy时定时器清空
-
1
2
3
4
5
6
7
8
9
10
11
12
13
14
15//将以上的东西放在mounted中创建,前面加上this.也是全局变量
mounted() {
this.scene = null
this.renderer = null
this.camera = null
this.controls = null
this.init()
},
//后续还要在beforeDestory中进行销毁
beforeDestroy() {
this.scene = null
this.renderer = null
this.camera = null
this.controls = null
} -
play() failed because the user didn‘t interact with the document first
本博客所有文章除特别声明外,均采用 CC BY-NC-SA 4.0 许可协议。转载请注明来自 百里飞洋!
若存在错误或不当之处,还望兄台不吝赐教,期待与您交流!
 WeChat微信打赏
- AliPay支付宝打赏


相关推荐
评论